Last Updated: April 20, 2025.
Introduction
Mastering studio lighting is the cornerstone of exceptional product photography. As professionals, we understand the pivotal role that lighting plays in crafting stunning images that showcase the essence of our products.
In this guide, we explore the complexity of studio lighting and offer valuable insights to elevate your product photography to new levels of excellence.
How Great Studio Lighting Impacts Sales
Let’s get to statistics! The more you understand how great studio lighting impacts product photography, the more you’ll see its impact on sales.
- Increase Conversion Rates: Boost conversion rates by 67% with high-quality images.
- Reduce Returns: Decrease return rates by 10% with clear, well-lit product photos.
- Enhance Engagement: 74% of online shoppers rely on product images for purchasing decisions.
- Build Trust: Professional, high-quality images instill trust in your brand.
- Social Media Shareability: Quality images are more shareable across social media platforms.
Table of Contents
Disclosure: As an Amazon Associate, johnmakphotography.com earns from qualifying purchases. If you click a link and purchase the item, we may receive an affiliate commission at no extra cost to you. We only recommend products or services that will add value to our readers. Read our full affiliate disclosure here. Thank you for supporting us!
1. Understanding Lighting Basics
When it comes to product photography, it’s crucial to remember three key elements. Each of these elements plays a critical role in capturing stunning product images.
Three Key Light Elements
- Light direction: The direction of light determines the shadows and highlights in your product images, influencing the overall mood and emphasis.
- Light intensity: Adjusting the intensity of the light source helps control the brightness and contrast in your photos, ensuring optimal exposure and detail.
- Light quality: The quality of light, whether soft or harsh, affects the texture and appearance of your products, conveying different feelings and enhancing visual appeal.
Natural vs. Artificial Light
Choosing between natural and artificial light can differentiate the result. That is totally up to you. Some photographers use natural light for their products, while others prefer artificial light.
As we discussed previously, artificial lights have the advantage of being able to control the direction, intensity, and quality of the light.
Soft vs. Hard Light
Last, I would like to mention the difference between soft and hard light because it significantly affects the appearance of each product.
- Soft light creates gently diffused shadows, smoothly transitioning from bright to dark areas. It also minimizes contrast and highlights details and textures more clearly.
- Hard light produces sharp shadows and highlights. It emphasizes contrast and texture while making the product more dramatic.
Soft lighting is mostly used in cosmetics or clothing. It minimizes imperfections and presents products in a softer, more appealing way.
Then again, hard light is suitable for jewelry, watches, electronics, and others, and they benefit from strong contrast and bold presentations to make a visual impact.
2. Essential Equipment for Product Photography Lighting
So, what lights do you need for product photography? The best lights for product photography include strobes, continuous lights, LED lights, speedlights, tungsten light bulbs, ring lights, softboxes, umbrellas, diffusers, reflectors, and bounce cards.
Light Sources
- Strobes lights are intense bursts of light used in product photography. They freeze motion and provide consistent illumination. They’re energy-efficient and compatible with various camera systems and accessories.
- Continuous Lights provide steady illumination throughout the photoshoot, allowing for real-time previews and adjustments. They are easy to set up and use, making them ideal for beginners or quick setups. Continuous lights offer a natural look and are suitable for capturing fast-moving subjects or shooting videos without waiting for recharge times.
- LED Lights, available in warm and cold, offer versatile and energy-efficient lighting for product photography. They provide steady illumination, making it easy to preview and adjust the lighting in real-time. LED lights are lightweight, portable, and generate minimal heat, making them suitable for various shooting environments. Their color temperature can be adjusted to achieve different moods and effects, from warm, inviting tones to cool, crisp lighting.
- Tungsten Light Bulbs emit a warm, natural glow, making them popular for creating cozy and inviting atmospheres in product photography. They provide continuous illumination. Tungsten bulbs are less energy-efficient compared to LED lights and require careful handling due to their fragility when hot. Despite these drawbacks, tungsten light bulbs remain a classic choice for photographers aiming for a warm and timeless aesthetic in their product images.
- Speedlights are portable flash units used in product photography for their versatility. They offer adjustable power levels and various modifiers, making them ideal for on-location shoots or when space is limited.
- Ring Lights are circular-shaped lights commonly used in product photography for their unique illumination features. They provide soft, even light that minimizes harsh shadows, making them ideal for capturing detailed shots of small products such as jewelry, cosmetics, or food.
Light Modifiers
- Softboxes are essential tools in product photography, offering controlled and diffused lighting for capturing products with detail and depth. These box-shaped enclosures house light sources and diffuse the light, resulting in soft, even illumination with gentle shadows. Softboxes are particularly beneficial for shooting products with reflective surfaces or intricate textures, as they help minimize harsh reflections and highlight details. They are versatile and can be used in various setups, from tabletop to portrait-style product photography. Softboxes are especially useful in studio environments where precise control over lighting is crucial for achieving professional-quality images.
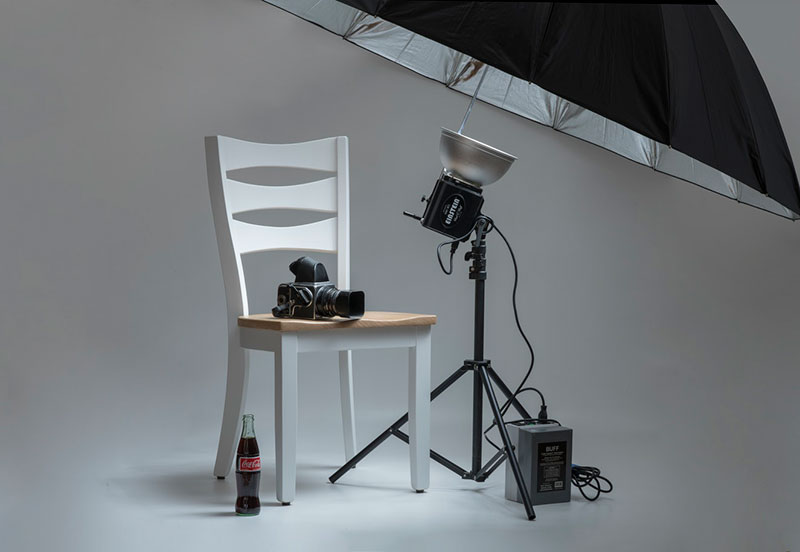
- Umbrellas & Diffusers are versatile tools in product photography, used to soften and diffuse harsh light for more flattering illumination. Umbrellas, typically made of reflective material, bounce light off their surface and spread it evenly, creating a broad, soft light source. They are excellent for filling in shadows and producing soft, natural-looking light that enhances product details. Diffusers, on the other hand, are translucent panels placed in front of light sources to scatter and soften the light. They provide a more subtle and even illumination, reducing harsh shadows and highlights. Umbrellas and diffusers are valuable for product photography, particularly in studio environments where precise control over lighting is essential for capturing products in their best light.
Reflectors and Bounce Cards
- Reflectors are indispensable tools in product photography. They manipulate and control light to achieve desired effects. Reflectors are typically large, flexible surfaces of reflective material, such as silver or white fabric. They bounce light back onto the subject, filling in shadows and adding brightness to areas that need highlighting. Reflectors are versatile and come in various shapes and sizes, making them useful for indoor and outdoor shoots.
- Bounce cards, on the other hand, are smaller and often rigid surfaces, usually white or silver, placed strategically to bounce light onto specific areas of the product. Reflectors and bounce cards are essential for photographers seeking to control light and create well-balanced, professional-looking product images. They are particularly effective for adding subtle fill light or enhancing highlights in close-up shots.
3. Studio Lighting Setups & Techniques
3.1. Natural Light Setup
Advantages and Challenges of Using Natural Light
Natural light is already diffused and free of cost. This means, you get this soft look that creates smooth shadows and highlights with zero investment.
With that said, a natural light source can also be unpredictable (weather plays a critical role on how intense and consistent the light will be throughout the day).
Where to find the best natural light sources?
Expansive areas with large windows that capture sunlight from early morning to late evening are perfect for natural light product photography.
For stronger lighting, consider scheduling your product photoshoots for midday when the sun is shining. Morning, evening, or cloudy weather works best for softer, more diffused lighting.
How to manipulate natural light?
There are numerous ways to control natural light, but two methods stand out for their effectiveness and ease of use:
- Diffusers: To soften and spread out the light, employ sheer curtains or professional diffusers or shoot on overcast days.
- Reflectors: Direct natural light onto your subjects with reflectors to fill in shadows and accentuate specific areas with highlights.
3.2. Artificial Light Setup
Which artificial lighting setup is best for product photography?
The best artificial light setup for product photography combine one light, two light, or three-point lighting.
As you add more lights to your setup, the complexity and control over the lighting increase, allowing for more creative possibilities. Here’s how adding more lights affects your setup:
One Light Setup:
It’s one of the simplest and most convenient lighting setups, perfect for easily creating dramatic shots!
- Using just one light source, whether a Studio Strobe or Continuous light, allows you to highlight your product by positioning it at various angles, depending on its size and type.
- You may also use high-power LED lights, fluorescent lamps, or tungsten light bulbs.
- This setup is versatile and can be used for various styles, from high contrast to soft and diffused lighting.
For beginners on a tight budget, here’s a simple suggestion: Start with just one continuous light and a white foam board.
This combination allows you to illuminate your product effectively while keeping costs low. The continuous light is your primary light source, while the white foam board acts as a reflector, bouncing light back onto your product to soften shadows and create more even lighting.
Two Light Setup:
Mastering the art of product photography often hinges on mastering lighting techniques, and the two-light setup is a cornerstone of this craft.
- In this setup, an additional light source is introduced alongside the primary light to enhance the scene’s illumination.
- It is also beneficial in reducing harsh shadows and creating a more balanced, evenly lit environment for your subject.
Three-Point Lighting Setup:
Three-point lighting is a classic setup that is immensely important in both photography and cinematography. It’s a versatile technique for visually appealing images with depth and texture.
This setup consists of three lights, each serving a distinct purpose: the key light, the fill light, and the backlight (also known as the hair light or rim light).
- Key Light: The key light is the primary light source in the three-point lighting setup. Positioned at a specific angle to the subject, it illuminates the primary areas of interest, creating the main highlights and shadows. This light defines the shape and texture of the subject, providing the foundation for the overall lighting scheme.
- Fill Light: The fill light complements the key light by softening the shadows it creates. Placed opposite the key light, it helps reduce the overall contrast in the scene, resulting in a more balanced and evenly illuminated image. The fill light is crucial in providing detail in the shadow areas without overpowering the main light, ensuring a natural-looking result.
- Backlight: The backlight is positioned behind the subject, illuminating the edges and separating it from the background. This light adds depth and dimension to the image by creating a subtle highlight along the subject’s outline. It helps emphasize the subject’s contours and prevents them from blending into the background, enhancing visual separation and depth.
The three-point lighting setup offers comprehensive control over the lighting environment, allowing photographers to sculpt the subject and create images with depth, dimension, and visual interest.
By mastering the placement and intensity of each light, photographers can achieve a wide range of effects, from dramatic and moody to soft and flattering, making it an essential technique for any photographer seeking to elevate their work.
Best 3 Continuous Lights for Product Photography
The Godox SL60W is a powerful continuous 60W LED light available at a very reasonable price. It is easy to operate and adjust the brightness via wireless remote control. It is suitable for stills and videos.
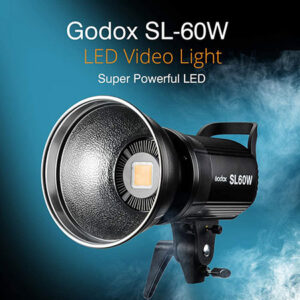
Click here to buy on Amazon.com.
The Godox FV150 is another great light for product photography. It can work simultaneously as a strobe and continuous light! The FV150 is slightly more expensive than the SL60W, but it’s worth every penny. It has special effects, is 100% customizable, and provides great daylight colors.
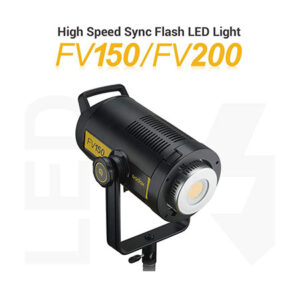
Click here to buy on Amazon.com.
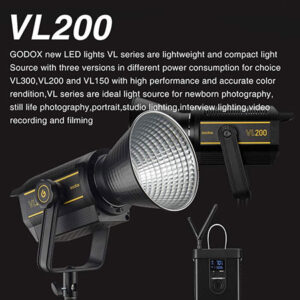
The Godox VL200 is a professional continuous light with 200W and high brightness. Its perfect compact design, color temperature of 5600k±200K, 16 channels, and adjustable brightness make it a great choice for professional product photography.
Click here to buy on Amazon.com.
What is Continuous Lighting?
Continuous lighting is a light that stays on all the time until you turn it off. On the other hand, strobe lighting is synced with your camera and turns on only when you press your camera’s shutter button to take a photo.
Using continuous lights, you can control where the light goes by moving it around your product and seeing how the light interacts in your scene.
Differences between Continuous Lights and Strobe Lights
The advantage of continuous lighting over strobe lighting is that you can use it for photos, videos, and product styling. When the light falls into your scene, you can manage the shadows and control how much light you want to bounce back to your products.
On the other hand, with strobe lighting, you only use it when you take photos and have no control over what happens in your scene before or after you take a shot.
Best 3 Strobe Lights for Product Photography
The Godox AD600BM Bowens Mount it’s a 600Watt with a stable color temperature at 5600+-200K. It has nine steps of power adjustment (1/1 and 1/256) and fully supports High-Speed Sync (HSS) for dramatic indoor or outdoor shooting. It also has a large LCD screen for more convenient operation.
Click here to buy on Amazon. com
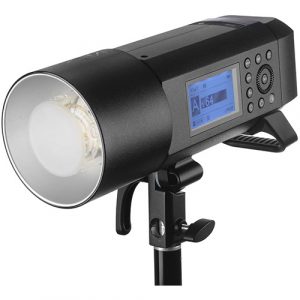
The Godox AD400 Pro is a 400Watt Strobe light with TTL, 1/8000 HSS, Battery Powered Mono Light, 30W Modeling Lamp, and 0.01-1 sec Recycle Time! The Godox PRO series is very popular among all studio lights and the best in the market.
Click here to buy on Amazon.com
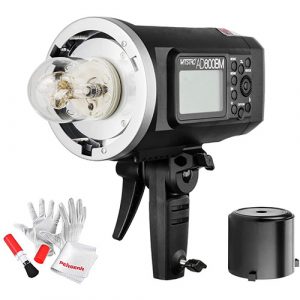
The Godox AD600 Pro is a 600-Watt Strobe Light with TTL, HSS 1/8000, and a Built-in 2.4G Wireless System. It’s one of the best studio lights out there, capable of shooting indoors or outdoors with consistent recycling.
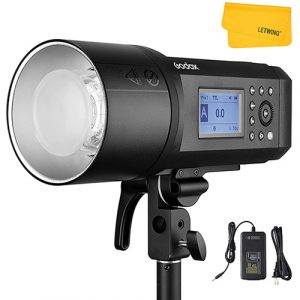
Click here to buy on Amazon.com.
3.3. Light Modifiers & Their Effects
Softboxes
Description: Softboxes are light modifiers with translucent fabric stretched over a metal frame. They are typically square or rectangular and used to diffuse and soften harsh light sources. Softboxes come in various sizes, from small ones for close-up photography to large ones for full-body or group portraits. They usually have an inner reflective surface that bounces and spreads light evenly across the fabric, creating a soft, flattering illumination. Studio photography uses softboxes for portrait, fashion, and product photography.
Effect on Light Quality: Softboxes produce a soft, diffused light that minimizes harsh shadows and creates smooth transitions between highlights and shadows. The larger the softbox relative to the subject, the softer the light it produces. Softboxes provide a controlled and directional light that is flattering for portraits and product photography, giving a gentle wraparound effect to the subject, enhancing textures, and reducing specular highlights. In product photography, softboxes can create even lighting with minimal reflections, which is ideal for showcasing products with intricate details.
Which Studio Softbox is best for product photography?
Always choose a large softbox. The bigger the size of the softbox, the wider the light will spread and leave fewer shadows. However, you can play with the shadows (add/reduce) by not adding a softbox to your light or using one light with a softbox and the other plain.
The Godox Octagon Softbox 47″ is a nice softbox for product photography. Its light diffusion surface spreads light well. In addition, it is made with high-density nylon and is easy to fold.
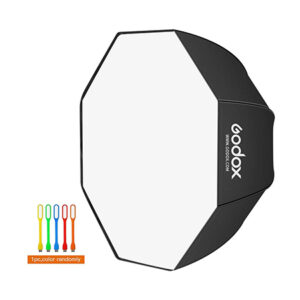
Click here to buy on Amazon.com
Umbrellas
Description: Umbrellas are versatile light modifiers with a reflective fabric stretched over a metal or fiberglass frame. They are often used in photography studios due to their ease of setup and affordability. Umbrellas come in two main types: shoot-through and reflective. Shoot-through umbrellas have a translucent fabric that allows light to pass through, creating a soft and diffused illumination. Reflective umbrellas have a reflective inner surface directing light towards the subject, resulting in a softer, more spread-out light than a direct light source. Umbrellas are available in various sizes and shapes, including round and octagonal.
Effect on Light Quality: Umbrellas can produce various lighting effects depending on their type and position. Shoot-through umbrellas create a soft, wraparound light that minimizes harsh shadows and is ideal for portrait photography, providing a flattering illumination with gentle transitions between highlights and shadows. Reflective umbrellas produce a softer light than direct sources like bare bulbs or strobes. They offer a more diffuse and even illumination suitable for various subjects, from portraits to product photography. Reflective umbrellas are particularly useful for creating a natural, ambient feel in the lighting, making them popular choices for indoor and outdoor shoots.
Which Studio Umbrella is best for product photography?
Choosing the best studio umbrella for product photography depends on several factors, including the type of product, desired lighting effect, and budget. Here are three popular types of studio umbrellas commonly used in product photography:
White Shoot-Through Umbrella
- Best For: Soft, diffused lighting. This is ideal for product photography, where you want to create gentle, even lighting with soft shadows.
- How It Works: Light passes through the white umbrella fabric, creating a soft, flattering light that wraps around the product.
- Advantages: It is affordable, portable, and versatile. It produces a soft, natural look that is great for most products.
- Recommended For: Small to medium-sized products, such as jewelry, cosmetics, or small electronics.
Silver Reflective Umbrella
- Best For: Stronger, more directional lighting with increased contrast and specular highlights.
- How It Works: The silver interior reflects light onto the product, creating a more intense and focused light source.
- Advantages: Provides more control over the direction and intensity of light. It’s suitable for creating dramatic lighting effects or emphasizing textures.
- Recommended For: Products that require more contrast and definition, such as metal or glass objects.
Parabolic Umbrella
- Best For: Producing soft, even lighting over a larger area.
- How It Works: Similar to a white shoot-through umbrella, but with a deeper shape that allows for more efficient light distribution.
- Advantages: It provides a broader light spread with less spill, making it ideal for larger products or group shots.
- Recommended For: Larger products, furniture, or multiple products in a single shot.
Ultimately, the best choice depends on your specific photography needs and preferences. A white shoot-through umbrella is a great all-around choice if you’re starting or need a versatile option. If you require more control over the light or want to achieve specific effects, a silver reflective or parabolic umbrella may be more suitable.
When deciding, consider your shooting environment, the type of products you typically photograph, and your budget. Remember, experimentation is key to finding the perfect lighting setup for your product photography.
3.4. Reflectors & Bounce Cards
A great reflector can give you beautiful, soft light if you know which one to get and how to use it! Furthermore, you don’t need to spend a lot of money on a reflector, but it is essential if you use one light source and want to balance your shadows and highlights.
Reflectors
The Neewer 5-in-1 portable round photography lighting reflector is a great choice. This collapsible multi-purpose reflector is a very helpful lighting accessory solution. It includes 5 different reflectors (silver, gold, white, black, and translucent fabric), and it is very easy to pack and take with you if you photograph products in a client’s space.

Click here to buy on Amazon.com
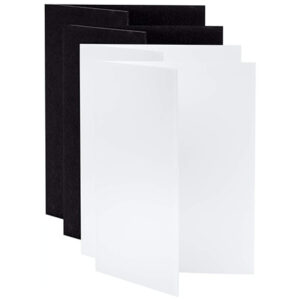
V-Flat Foam Boards
Shadows add depth. To reduce or direct shadows, you either have to use a foam board to reflect light onto your scene or use another light to fill in the shadows. Foam reflectors are another great solution, as is the V-FLAT WORLD Tabletop Reflector (Black/White).
Click here to buy on Amazon.com
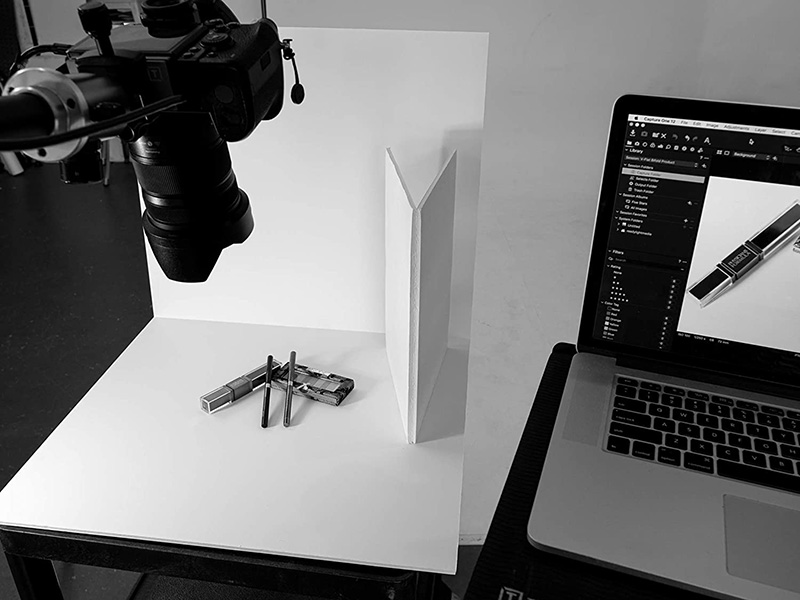
Furthermore, foam reflectors can be used in different scenarios. The image below shows that you can do anything to direct the light. This example uses two white foam reflectors, one strobe light, a black backdrop, and two LED lights on each side.

Another example is in the image below. Notice the differences between using the white or black foam reflector. It’s totally up to you to create the style you want. I prefer the whiteboard to show more detail and introduce softer light to my product.

How Many Reflectors Should You Use in Product Photography?
As a beginner, you can create a nice photo studio space with just one continuous light and a reflector to start taking product shots.
When you can direct light the way you want with just one light and a reflector, you might want to try a second or even a third light.
In both cases, you aim to adjust the brightness, control the shadows, and introduce softer lights on your products. Remember, the larger the diffuser (Softbox or reflector), the softer the light.
3.5. Product Photography Lightbox
Are light boxes a great light solution for product photography?
It comes down to your personal preferences. Lighting boxes come in different sizes, and you don’t need to buy a bunch of strobe or continuous lights. However, your space is limited.
This Neewer Photo Studio Light Box allows you to shoot great product shots. The LED adjustable lighting helps you control the brightness. The reflectors and background spread the light equally, giving the shot a pleasant look.
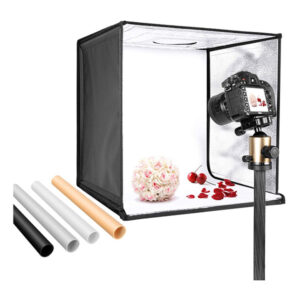
Click here to buy on Amazon.com.
Conclusion
In conclusion, mastering lighting in product photography is the key to capturing captivating images that highlight the best features of your merchandise. This article explored various lighting techniques and setups, from the basics to more advanced methods.
Lighting isn’t just about brightness; it’s about storytelling. It sets the mood, enhances textures, and draws attention to important details. By understanding lighting principles and experimenting with different setups, you can create compelling product images that resonate with your audience.
Now it’s your turn. Apply what you’ve learned here to your product photography. Don’t hesitate to experiment with different lighting setups and modifiers to discover what works best for your products.
Ready to elevate your product photography? Start experimenting with lighting today and watch your images come to life!
Ready to elevate your product photography? Try these lighting techniques today and see the difference in your images!
5 thoughts on “What Lighting is Best for Product Photography? – 2025 Guide”
By far the BEST tutorial on Product photography! Great tips! Thanks.. 🙂
Thank you for the kind words, Marie. We hope these tips will help your business grow!
John, your product photography lighting guide is a goldmine of information for photographers and e-commerce businesses. Achieving great product photos is crucial for showcasing items effectively, and your guide breaks down the process in a clear and comprehensive way. The tips on lighting techniques, equipment recommendations, and common mistakes to avoid are incredibly valuable. It’s evident that you have a deep understanding of product photography and a passion for sharing your knowledge.
As a photographer passionate about product photography, I found this lighting guide informative and insightful. The detailed explanations of different lighting setups, equipment recommendations, and the importance of light modifiers have truly enhanced my understanding of creating captivating product images. Thank you for sharing such valuable knowledge!
hey John , its been an amazing visit on your website. gathered and learned some useful information. keep sharing amazing things.